Have you ever wondered how tech giants like Facebook or Netflix manage to serve billions of requests every day without crashing? The secret lies not just in the raw power of their servers, but in the intelligent “gatekeeper” standing at the front door. In the world of Linux Web Servers, the most powerful name is Nginx with its Reverse Proxy feature.
If you are looking to hide your server’s real IP address, improve page load speeds, or simply run multiple applications (NodeJS, Python, Java) on a single server, this article is exactly for you. Let’s dive into the system architecture and deploy a DevOps-standard Reverse Proxy right now.
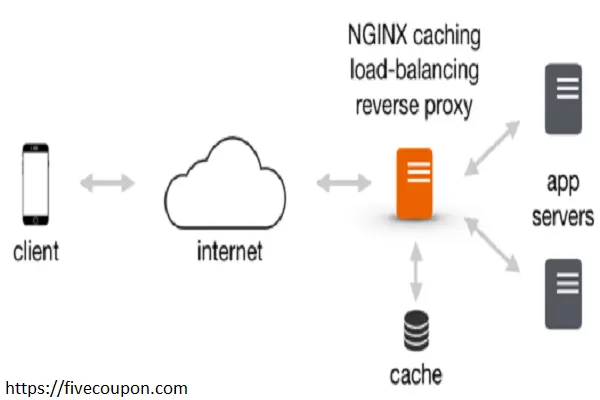
What is a Reverse Proxy? Why is it Your Server’s “Bodyguard”?
Before we jump into the command line, let’s visualize this: Imagine you are a famous celebrity (the Backend Server), and you don’t want just anyone walking into your home to ask for an autograph. You need a personal assistant (the Reverse Proxy). Fans (the Clients) send requests to the assistant, the assistant filters them, brings them to you, gets the autograph, and hands it back to the fans.
Technically, a Reverse Proxy is an intermediate server that sits between the Client (user) and the Server (where data is stored).
- Core Concept: Every request from the client and response from the server must pass through the Proxy Server. As a result, the origin server remains completely anonymous and secure.
The Difference Between Forward Proxy and Reverse Proxy
- Forward Proxy: Protects the Client (e.g., A company network blocking employees from accessing Facebook; the proxy acts on behalf of the employees).
- Reverse Proxy: Protects the Server (Acts on behalf of the Server to accept requests from the internet).
4 Vital Benefits of Using Nginx as a Reverse Proxy
Why has Nginx surpassed Apache to become the #1 choice for Reverse Proxies? Here are 4 reasons why system engineers love it:
Security & Anonymity
This is the biggest benefit. Without a Reverse Proxy, hackers can discover the exact IP of the server hosting your Database and attack it directly. With Nginx, the outside world only sees the Proxy Server’s IP. It acts as a firewall, filtering malicious requests before they ever touch your application.
Load Balancing
As your website grows, a single server won’t be able to handle the heat. Nginx allows you to distribute traffic across a group of multiple servers (Server Cluster).
- If Server A is overloaded or goes down, Nginx automatically redirects traffic to Server B.
- This ensures High Availability for your system.
Web Acceleration
Nginx handles static files (images, CSS, JS) incredibly fast. You can configure Nginx to compress data (Gzip) and cache frequently accessed content. This significantly reduces the load on your Backend Server, making the application run smoother.
Simplified Architecture (Port Management)
You might run App A (NodeJS) on port 3000 and App B (Python) on port 8000. However, users shouldn’t have to type domain.com:3000 to access your site. Nginx listens on port 80/443 (standard web ports) and routes requests to the correct application port based on the domain name.
Nginx Reverse Proxy Configuration Guide
In this section, we will get hands-on. Let’s assume you have an application running at localhost:3000 and want to make it public via the internet using the domain fivecoupon.com.
Install Nginx
If you haven’t installed it yet, please refer to the following article:
Create a Virtual Host Configuration File
Important Note: Many old tutorials suggest editing /etc/nginx/sites-available/default ( Virtual Hosts configuration file on Ubuntu ). Do not do this! It is best practice to create a separate configuration file for easier management.
Create a new file:
sudo nano /etc/nginx/sites-available/fivecoupon.com
Write the Reverse Proxy Configuration
Below is a standard configuration template, optimized with critical header parameters:
server {
    listen 80;
    server_name fivecoupon.com www.fivecoupon.com;

    # Separate log files for easier debugging
    access_log /var/log/nginx/fivecoupon_access.log;
    error_log /var/log/nginx/fivecoupon_error.log;

    location / {
        # Point to the backend application
        proxy_pass http://127.0.0.1:3000; # Change to your App's IP:Port

        # Critical Headers so the Backend recognizes the Client correctly
        proxy_set_header Host $host; # Keep the original Host header [cite: 19]
        proxy_set_header X-Real-IP $remote_addr; # Pass the real Client IP [cite: 17]
        proxy_set_header X-Forwarded-For $proxy_add_x_forwarded_for; # Chain of IPs [cite: 18]
        proxy_set_header X-Forwarded-Proto $scheme; # Identify protocol (http or https)

        # Optimize timeouts to avoid premature disconnections [cite: 20]
        proxy_read_timeout 90;
        proxy_connect_timeout 90;
    }
}
Deep Dive into Parameters:
- proxy_pass: This is the most important directive; it tells Nginx where to forward the request.
- proxy_set_header: By default, when passing through a Proxy, user information (like IP) is lost and replaced by the Proxy’s IP. These lines help “reattach” the original info to the header so the Backend can process it correctly.
Activate and Test
Create a symbolic link (symlink) to activate the configuration:
sudo ln -s /etc/nginx/sites-available/fivecoupon.com /etc/nginx/sites-enabled/
Check the syntax for errors (Very Important):
sudo nginx -t
If it reports Syntax OK, reload Nginx to apply changes:
sudo systemctl reload nginx
Advanced: Load Balancing with Nginx
If you have high traffic volume and want to distribute the load across multiple servers, Nginx supports this powerfully via the upstream block.
Instead of pointing proxy_pass directly to a single IP, we define a group of servers:
# Define the backend server group
upstream backend_cluster {
     # Default algorithm is Round Robin
     server 10.0.0.10:3000;
     server 10.0.0.11:3000;
     server 10.0.0.12:3000;
}

server {
    listen 80;
    server_name fivecoupon.com;

    location / {
        proxy_pass http://backend_cluster; # Point to the upstream name
        proxy_set_header Host $host;
        # ... other headers
    }
}
With this configuration, Nginx will automatically distribute requests evenly among the 3 servers, helping the system scale easily.
FAQ & Troubleshooting
During operation, you will inevitably encounter errors. Here are some solutions to common issues:
What does “502 Bad Gateway” mean?
This is the most common error. It means Nginx is working fine, but your Backend Server (NodeJS/Python app) is down, hanging, or not responding.
- Fix: Check if your application on port 3000 is running (curl -I http://127.0.0.1:3000).
Error “413 Request Entity Too Large”
This error appears when you upload large files. By default, Nginx only allows uploads up to 1MB.
- Fix: Add the line client_max_body_size 10M; inside the server or http block.
How do I install HTTPS (SSL)?
Don’t let your website run on insecure HTTP. Use Certbot to install free SSL from Let’s Encrypt:
sudo apt install certbot python3-certbot-nginx
sudo certbot --nginx -d fivecoupon.com
Conclusion
Deploying an Nginx Reverse Proxy is the first and most crucial step in building a professional, secure, and high-performance Web Server system. It not only helps you anonymize your origin server but also unlocks infinite System Scaling capabilities in the future.
I hope this article has helped you understand the core concepts and given you the confidence to configure your own system. If you face any difficulties during installation, or encounter a stubborn 502 error, don’t hesitate to leave a comment below, and I will help you debug it in detail.
Good luck with your deployment!