Have you just migrated your WordPress site from a cramped Shared Hosting environment to a spacious VPS running Ubuntu? Or are you struggling with the dreaded “404 Not Found” error every time you click on a post? Don’t worry, you are not alone. Configuring Nginx for WordPress is a technical challenge, but once you master it, you will own a website with lightning-fast load speeds.
In this guide, fivecoupon.com won’t just hand you dry code snippets. I will explain exactly how Nginx operates as a powerful Reverse Proxy to accelerate your website, and I will guide you step-by-step to build the standard configuration file, updated for the latest PHP versions.
Why Choose Nginx Instead of Apache for WordPress?
Before diving into the command lines, let’s understand why tech giants are switching to Nginx.
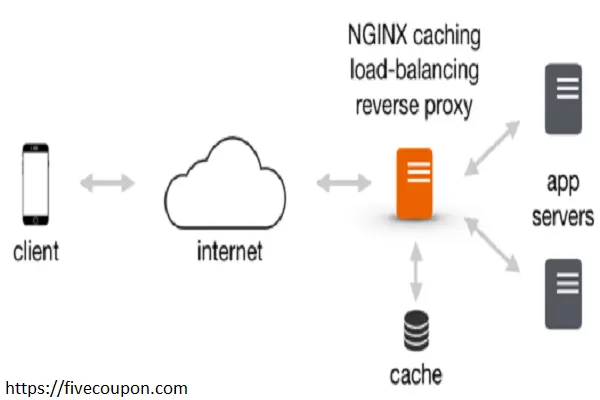
Along with Apache and Tomcat, Nginx is one of the most popular web servers on the Linux OS. However, the real power of Nginx lies in its event-driven architecture and its Reverse Proxy features.
- Web Acceleration: Nginx is used as a solution to improve performance by compressing input/output data and caching static content efficiently.
- Load Balancing: If your website grows significantly, Nginx’s Reverse Proxy feature can route requests to multiple individual applications or servers. This ensures your system can handle traffic spikes without crashing.
- Security & Anonymity: Acting as an intermediary proxy server, Nginx allows the backend server to remain completely anonymous to the Client. It can filter requests and hide the server’s IP address, adding a crucial layer of security.
Analyzing the Nginx Configuration File
To start configuring, we need to edit or create a Virtual Host configuration file. On Ubuntu, the default file is located at /etc/nginx/sites-available/default.
However, expert advice: Do not edit the default file directly. Create a new file named after your domain (e.g., yourdomain.conf) for better management.
A basic Server Block looks like this:
server {
     listen 80;
     server_name example.com www.example.com;
     root /var/www/html/example.com;
     # ... other configurations
}
Our task is to “inject” directives into this block so Nginx understands how to process WordPress PHP code.
4-Step Guide to Configuring Nginx for WordPress
Below is the standard process to turn a raw config file into an optimized one for WordPress.
Step 1: Declare Index for PHP
By default, Nginx might not prioritize index.php. We need to edit the index line to tell Nginx: “Look for the php file to run first.”
Find this line:
index index.html index.htm index.nginx-debian.html;
Change it to: (Add index.php to the beginning)
index index.php index.html index.htm index.nginx-debian.html;
This ensures that when a user types your domain, the WordPress homepage loads immediately.
Step 2: Fix 404 Permalink Errors with try_files
This is the most critical part. Many users encounter 404 Not Found errors when accessing sub-pages (e.g., domain.com/my-post). This happens because the default Nginx config does not understand WordPress Permalinks.
In the original configuration, you will see this line:
location / {
    # First attempt to serve request as file, then
    # as directory, then fall back to displaying a 404.
    try_files $uri $uri/ =404;
}
The line try_files $uri $uri/ =404 means: If the actual file is not found, return a 404 error. This breaks WordPress Permalinks.
The Solution: You must comment out that line and replace it with a parameter that redirects requests to index.php.
Change it to:
location / {
     try_files $uri $uri/ /index.php?q=$uri&$args;
}
Note: $args helps retain URL parameters (e.g., ?utm_source=facebook), which is vital for ad tracking.
Step 3: Configure PHP Processing (FastCGI)
Nginx does not execute PHP by itself; it needs to pass the request to PHP-FPM. You need to uncomment the lines in the location ~ \.php$ block.
Note on PHP Version: Older guides often use php7.4-fpm.sock. However, in 2024, you should use PHP 8.1 or PHP 8.2. Check your server’s PHP version using the command php -v.
The standard configuration snippet is:
location ~ \.php$ {
     include snippets/fastcgi-php.conf;

     # Use Unix Socket (Recommended for speed over TCP)
     # Change 8.1 to the version you are installing (8.0, 8.2, 8.3...)
     fastcgi_pass unix:/var/run/php/php8.1-fpm.sock;

     # If using TCP socket (less common):
     # fastcgi_pass 127.0.0.1:9000;
}
Step 4: System File Security
To prevent hackers from snooping on sensitive configuration files (like .htaccess if you migrated from Apache), keep or add this block to deny access to hidden files:
location ~ /\.ht {
    deny all;
}
The Complete Nginx Configuration File
After combining the steps above, here is the complete configuration file you can use (save it at /etc/nginx/sites-available/your-domain).
server {
    # Listen on port 80 (HTTP)
    listen 80;
    listen [::]:80;

    # Change to your domain name
    server_name example.com www.example.com;

    # Path to the WordPress root directory
    root /var/www/html/example.com;

    # Prioritize index.php
    index index.php index.html index.htm index.nginx-debian.html;

    # Log configuration (Optional, helps with debugging)
    access_log /var/log/nginx/wordpress_access.log;
    error_log /var/log/nginx/wordpress_error.log;

    # MAIN LOGIC: Makes WordPress Permalinks work
    location / {
        try_files $uri $uri/ /index.php?q=$uri&$args;
    }

    # PHP PROCESSING: Pass requests to PHP-FPM
    location ~ \.php$ {
        include snippets/fastcgi-php.conf;
        # ATTENTION: Check the exact PHP version you installed
        fastcgi_pass unix:/var/run/php/php8.1-fpm.sock;

        # Increase timeout if scripts take long to run
        fastcgi_read_timeout 300;
    }

    # SECURITY & CACHE CONFIG (Basic)

    # Block access to hidden files
    location ~ /\.ht {
        deny all;
    }

    # Cache static files (images, css, js) for speed
    location ~* \.(css|gif|ico|jpeg|jpg|js|png)$ {
        expires max;
        log_not_found off;
    }
}
Testing and Activating the Configuration
After saving the file, do not restart Nginx immediately. You must check the syntax first.
- Check for errors: Run the command: sudo nginx -t
- If the result says syntax is ok and test is successful, Great! You did it correctly.
- If it reports failed: Read the error message carefully to see which line in the config file has the issue.
- Reload Nginx: To update the configuration without interrupting current connections, use the reload command: sudo systemctl reload nginx.
Conclusion
Using Nginx (or a Reverse Proxy model) offers numerous benefits, helping your website system operate smoothly and securely. It also helps scale large web systems with high traffic.
I hope this article has given you the confidence to master the Nginx configuration file for WordPress. A standard config file not only keeps your site stable but is also a key factor for Google to rate your Page Experience highly.
Next Step: You have configured HTTP (Port 80), but don’t stop there. Install a free SSL certificate (HTTPS) immediately using Certbot to protect your customer data.
If you encounter any issues during the installation, please leave a comment below, and I will help you debug it!